Use the table of contents to navigate to the section you want to learn more about.
- Adding Records to Notebook
- Creating a Project in Notebook
- Add Records from Different Search Modules to the Same Project
- Accessing Your Records & Projects in Notebook
In order to start gaining insights across GovSpend data, you need to add records to your notebook. Follow the steps below to learn how to add GovSpend data to your notebook, create new projects, and more.
Adding Records to Notebook & Creating Projects
The Notebook feature is available across the following modules in GovSpend:
Adding records to the notebook and creating new projects follows the same steps across all modules.
Adding Records to Notebook
- Within a module that supports notebook (bids, contracts, spending, meetings), use the checkboxes at the far left of the search results table to select the records you want to add to your notebook.

- You can select one single record, or multi-select records to add to your notebook

- Note for Meeting Intelligence: In order to add records from Meeting Intelligence to Notebook, you must be in the default "table" view from the bottom of your search results page.
❗IMPORTANT NOTE: We recommend adding no more than 100-200 records to a single project at once. This will ensure optimal performance and high quality responses.
- Once you've selected your records, you'll see the "Add to Notebook" button become enabled at the top of your search results in the right

- To add your selected records to your notebook, click "Add to Notebook"
- Next you will be prompted to add your records to an existing project or to create a new project
- Note: You must add your selected records to a project for you to be able to access them in Notebook.

- Note: The list of available projects is pulled directly from your individual notebook. If you created a project in Notebook, it will be available for you to select.
- To create a new project, click "Create Project"
- Enter the name of your new project and click "Save & Open" to automatically launch Notebeook in a new tab
- Note: You can uncheck "Open in new tab" if you prefer not to launch Notebook when you save

- Your new project will be added to the top of the project list and selected by default
- Note: You can uncheck "Open in new tab" if you prefer not to launch Notebook when you save
- Click "Add X Records" to add all your selected records to the designated project in notebook
- Note: Depending on the number of records you selected, it may take a little time to load the records to your notebook. The modal will close when records are successfully added.
- Once all records have been sent to your notebook, a toast will appear indicating success/failure of moving records to notebook
- Success: If your records successfully move to notebook, a green success message will appear and indicate the number of records and associated documents sent to notebook

- Failure: If there is an issue sending records to your notebook, you will see a red toast with an error message. We recommend you first check notebook to confirm what data may not have been added correctly. Once you confirm that, you can retry adding any records that were not successful, or reach out to the Product team for support.

Add Records from Different Search Modules to the Same Project
- Once you've added records from one module to a project, you can go to another module and select records to add to the same project. For example, you can add some bids to a project and then go to the Contracts module and select contracts to add, giving you the ability to ask questions across a set of bids and contracts at once.
- For example, I'm going to select a few spending records to add to the project I created above for Bids.

-
- Once I've selected my records, I simply select the project I created for my bid records and add them to that same project.

Accessing Your Records & Projects in Notebook
-
Once you've added the records you want to your various projects, click AI Notebook within the left hand navigation to access it

- Use the dropdown in the project panel on the left to view your projects. Any project you create from GovSpend will appear in this list.
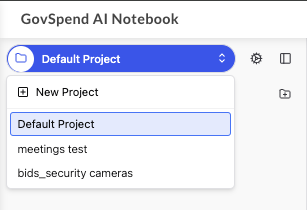
- Select a project to access all the data from GovSpend that you've added to that project

-
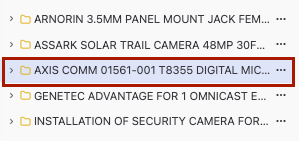
All records you've added to that project will display as a list in the left panel of your Notebook. Simply use the scroll bar to the right of the dropdown field to view all your projects.

-
Each record will display with the corresponding title for the record, for example Bid Title, Meeting Title, etc.
-
When you click on a record, you will see the data for that record from GovSpend in the main panel of the notebook. For example if you click a bid from the list, in the center document viewer panel you'll see all the bid data and fields from GovSpend. This ensures all of that data can be used as context in any chat/questioning you perform.

-
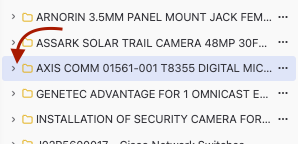
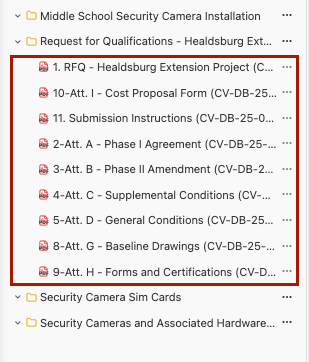
To access the documents for a given record, click the sideways carrot to the left of the record title to show the corresponding documents nested underneath.
-
You can select any document and it will open up in the main document viewer.
